4. Data access#
In May 2024, data security policies were implemented at BMM. This has impact on user operations and data access.
Data is now written to a secure location on central storage. Access to your data now requires authentication using your BNL domain account, your password, and two-factor authentication with DUO or a Yubi key.
The beamline operator account does not have access to user’s data.
This section of the beamline manual explains how to access your data during and after your experiment.
4.1. Downloading data#
4.1.1. SFTP Client#
You will need an sftp client.
Cross-platform: FileZilla. This is a free program available for Windows, Apple, and Linux. The explanation below will be made using FileZilla.
Windows users: A popular option is WinSCP. Be careful at the WinSCP website. You will see multiple pop-up adds with download links to other software packages. Be careful to click on the link to the WinSCP package.
Linux users: Your desktop file manager likely has an sftp client built in. Try typing
sftp://<username>@sftp.nsls2.bnl.govinto your file manager or create a new network drive usingsshandsftp.nsls2.bnl.gov.sshfs is an excellent solution.
sshfsallows you to easily mount the remote sftp site to a local mount point, allowing you to browse the remote site as if it were a local folder. For example, I do the following to mount the data folder locally on my laptop:sshfs bravel@sftp.nsls2.bnl.gov:/nsls2/data/bmm ~/mnt/bmm -o follow_symlinks
and this to unmount the data folder
fusermount -u mnt/bmm
4.1.2. The Short Version#
Executive Summary
Connect to sftp.nsls2.bnl.gov in your sftp client
Authenticate using your BNL username/password and DUO two-factor authentication
Navigate to
/nsls2/data/bmm/proposals/, then to the cycle folder corresponding to the date of your experiment, then to the folder with your proposal number. So, something like/nsls2/data/bmm/proposals/2024-2/pass-333333.Transfer your data to your local computer.
If you preserve the folder structure from the remote host, the the dossier files (Section 12.4) will work as expected.
The assets folder contains raw image and HDF5 from your
experiment. Those files will have database-friendly but
user-unfriendly names. The HDF5 files are rather large and will take
some time to download. The can skip downloading the assets folder
if you do not plan on using the HDF5 files directly.
4.1.3. A Guide with Pictures#
What follows is a guide with screenshots of using FileZilla to connect to the SFTP download site and begin downloading data.
To begin, open your sftp client. Here is FileZilla at startup. For FileZilla, click on the File menu, then click on Site Manager.
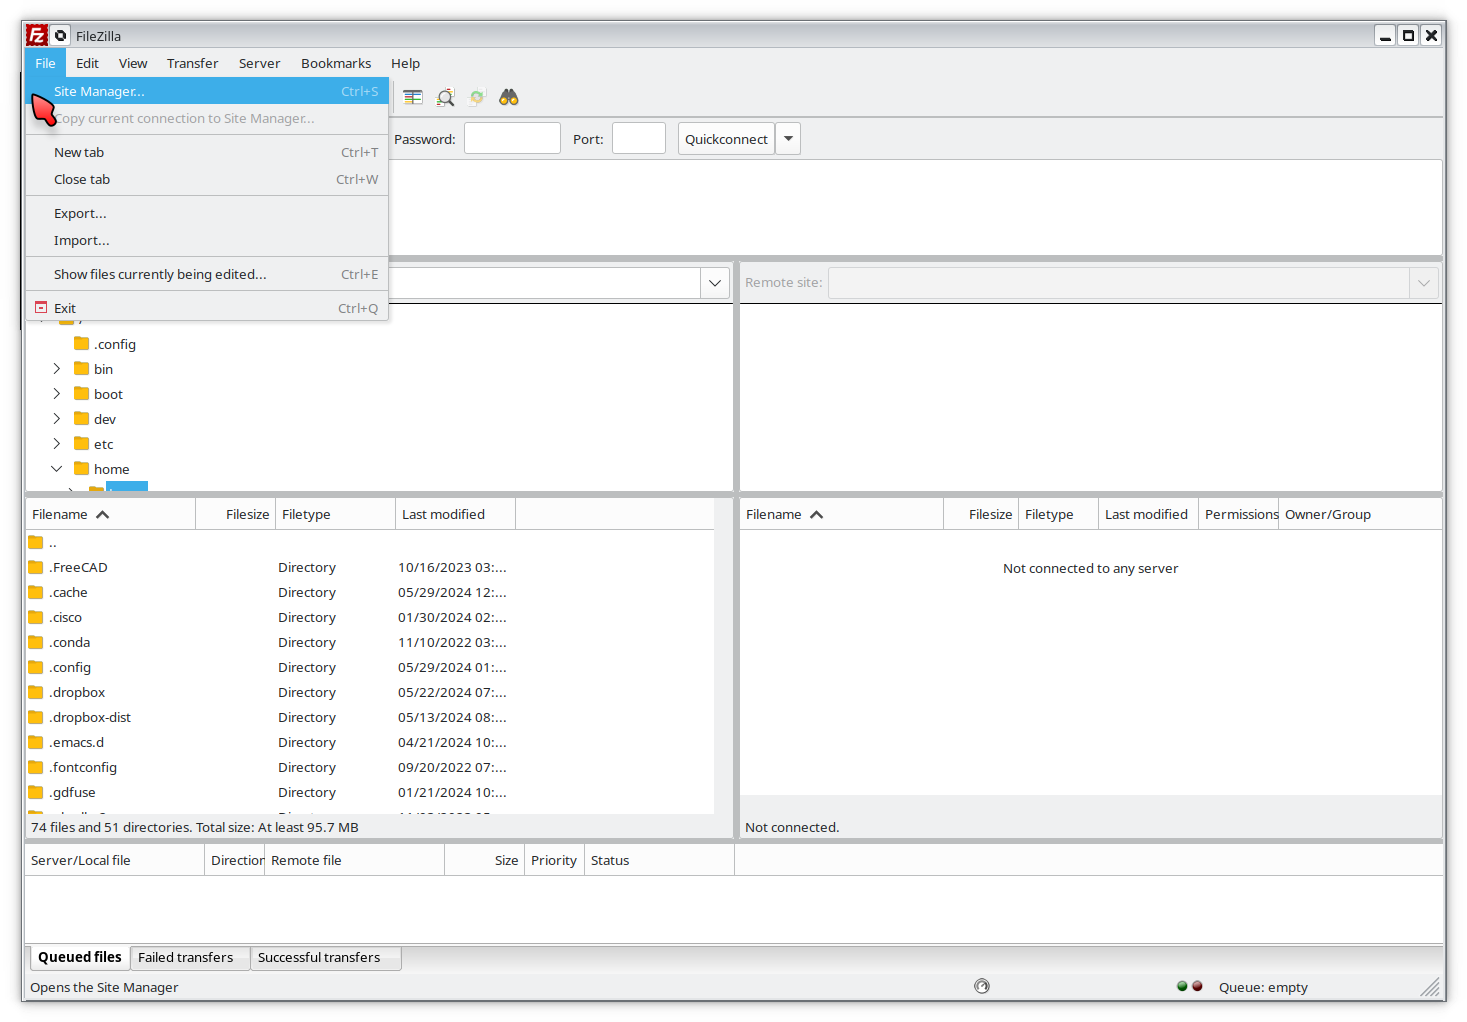
Fig. 4.1 FileZilla startup. Go to the Site Manager to establish a new location.#
In the site manager, click on the “New site” button and fill in the
details as shown below. Select the SFTP protocol, enter
sftp.nsls2.bnl.gov as the Host. The correct port number is 22,
but you can usually leave that blank. 22 is the default port for the
sftp protocol.
Finally, select “Interactive” as the logon type. That will tell FileZilla to prompt you for both user name and two-factor authentication.
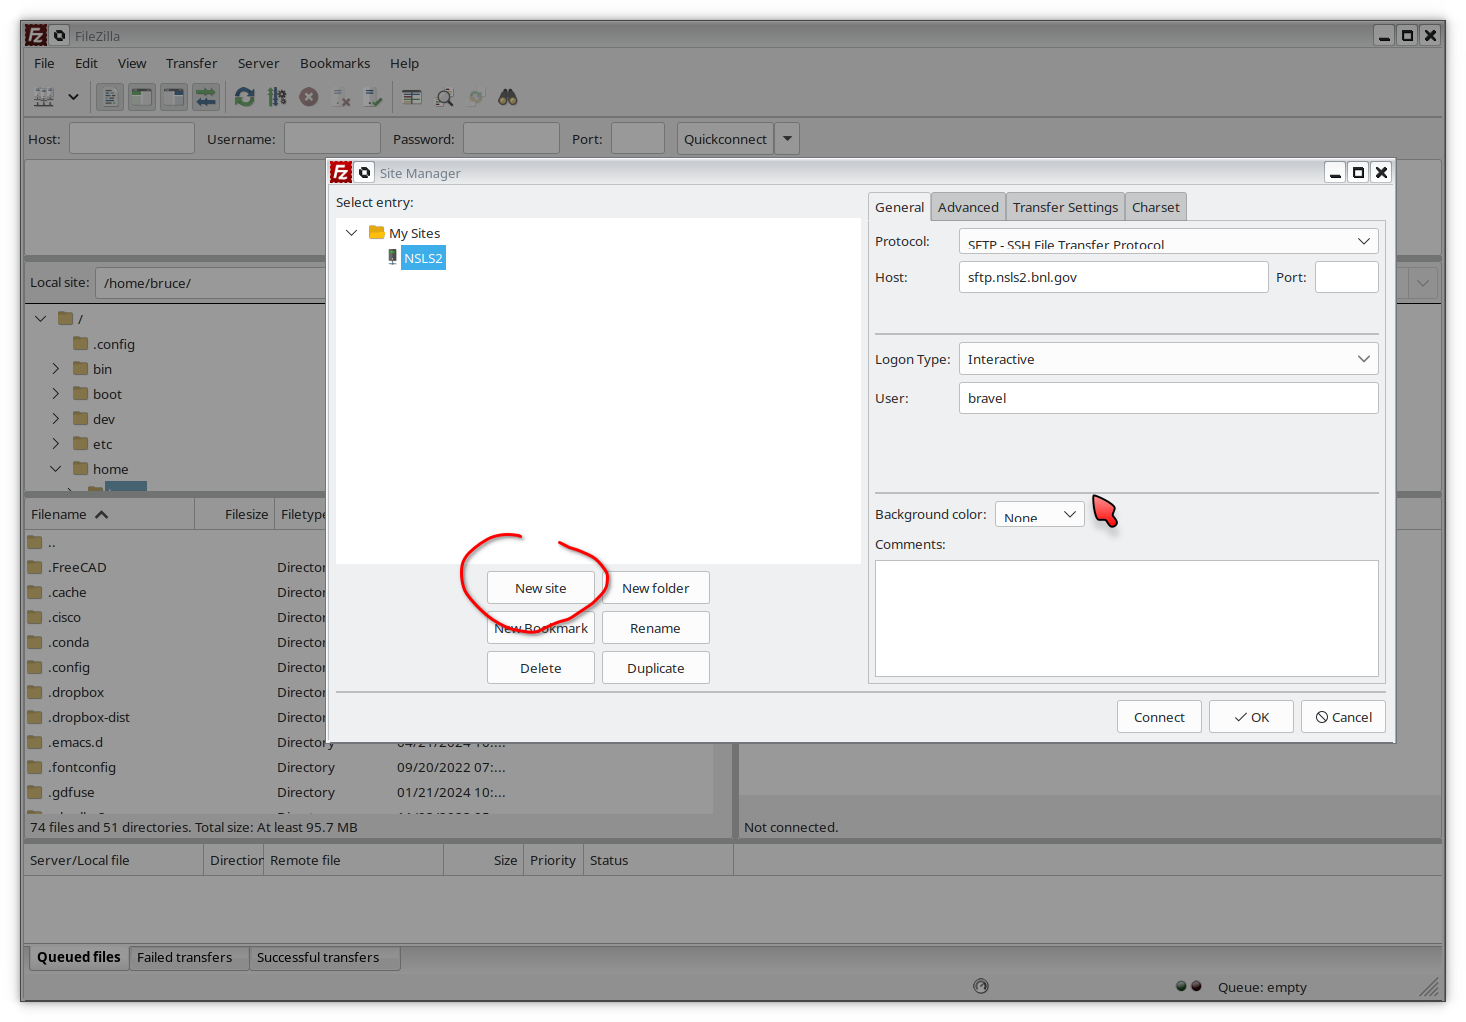
Fig. 4.2 Fill in the site manager with the location and logon type for the NSLS2 data center.#
Click OK to finish this configuration, then connect to the host.
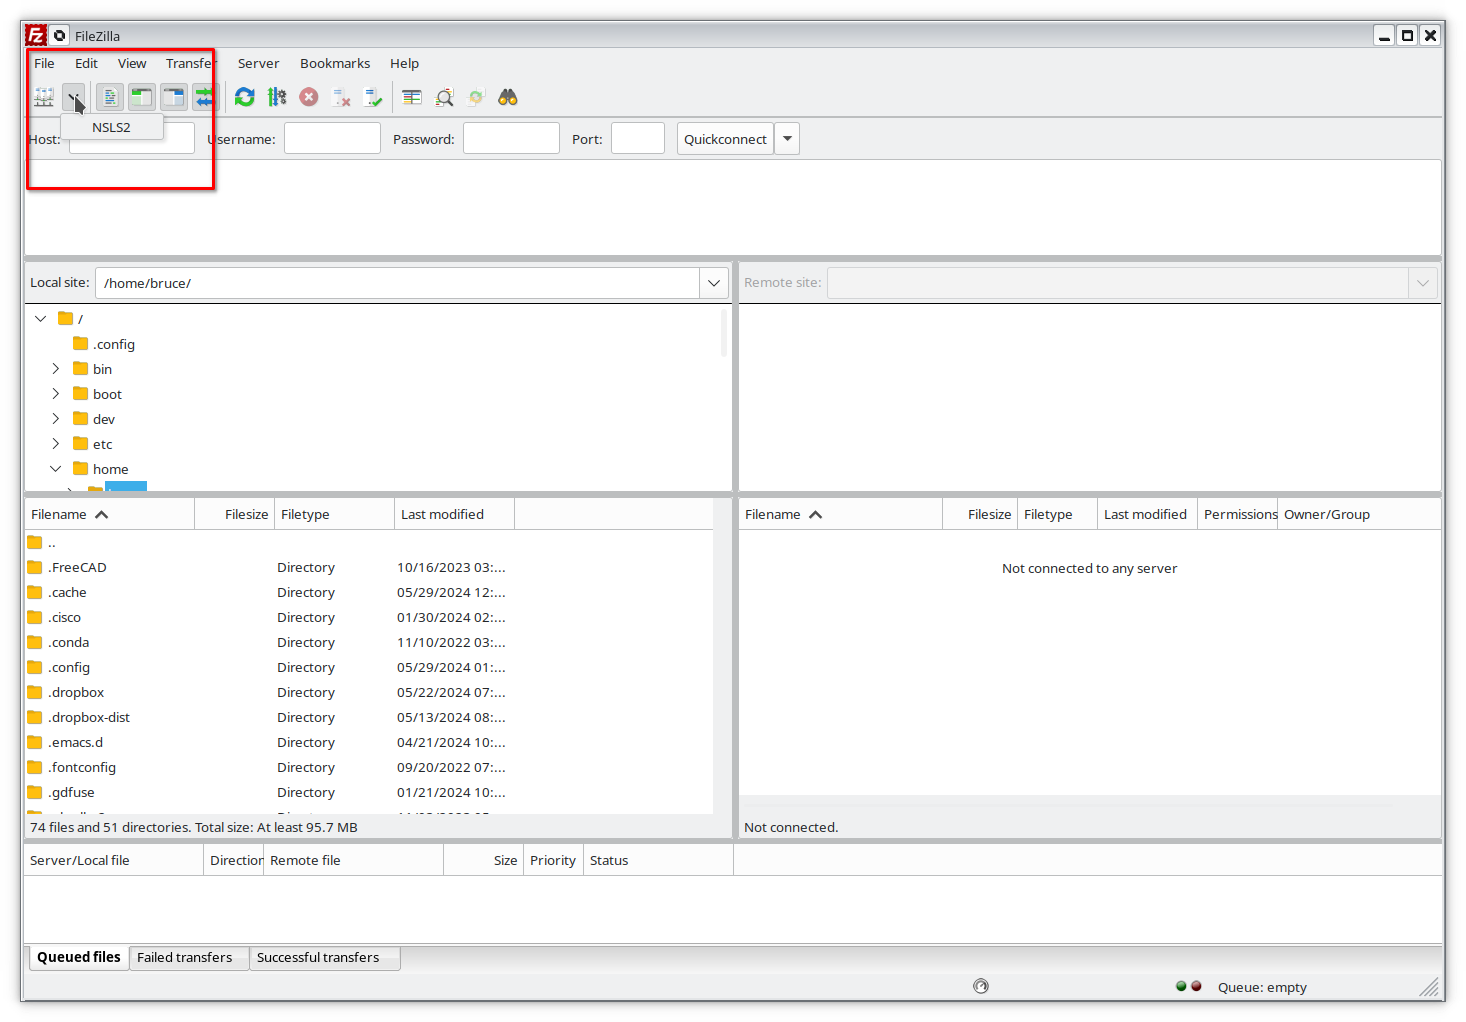
Fig. 4.3 Select the NSLS2 host from the drop-down list and click to connect.#
Connecting to the NSLS2 SFTP host will open up the password entry dialog.
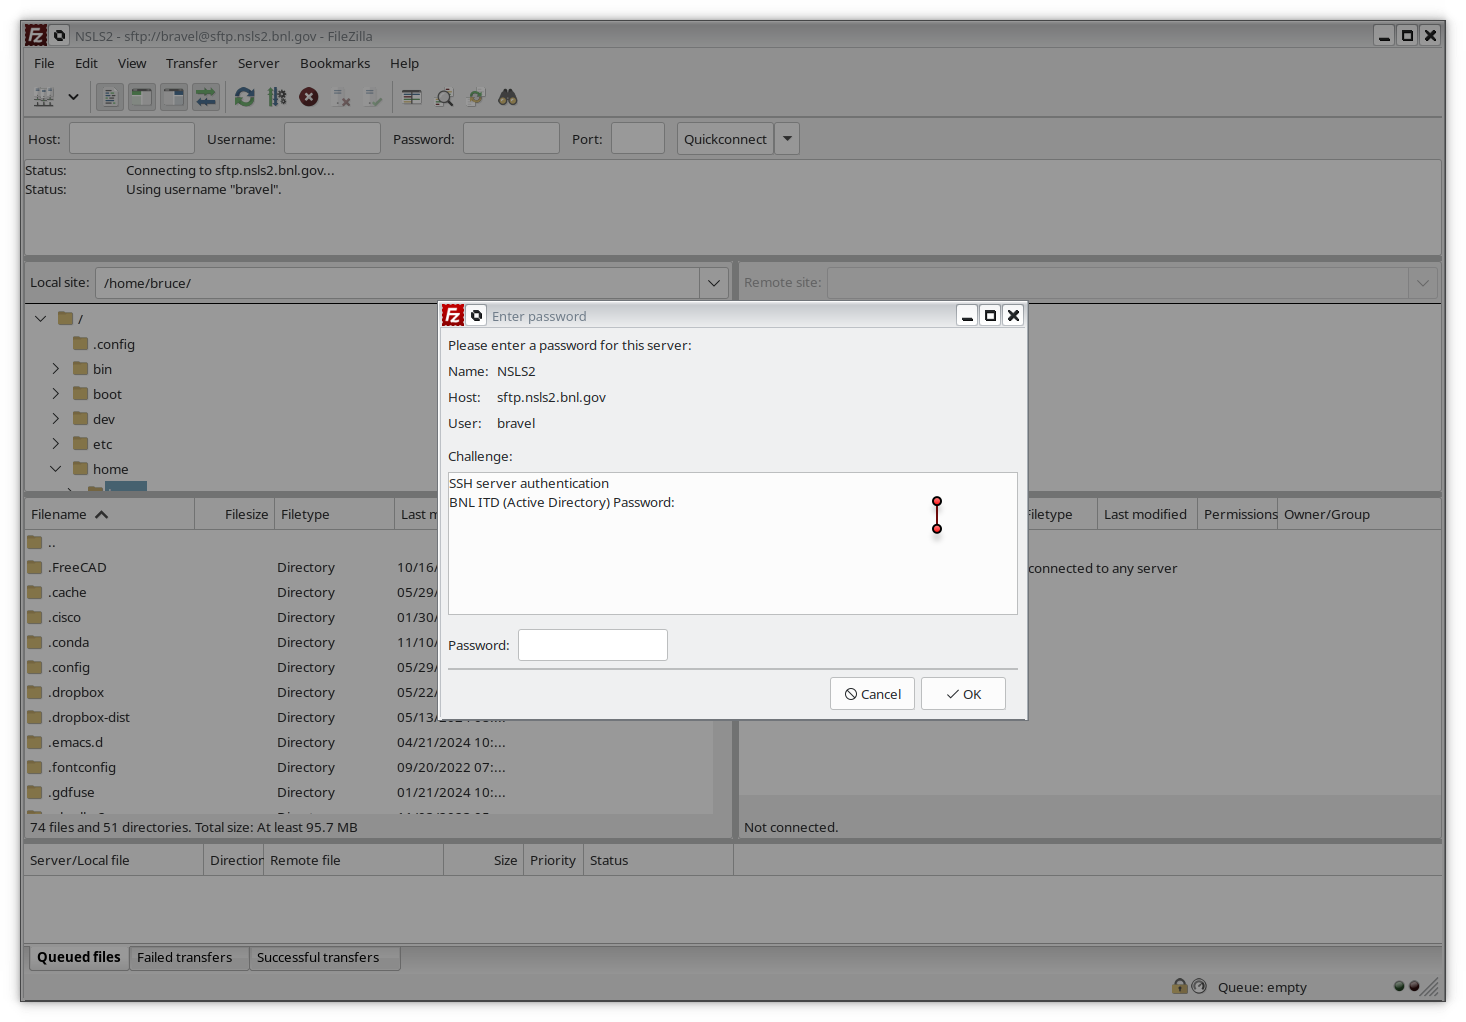
Fig. 4.4 Enter your BNL password and click OK.#
After entering your password, you will be prompted for two factor
authentication. In the “Password” box, type 1 and hit OK. Then
go to your phone and accept the DUO push.
If you use a Yubikey, click on the “Password” box and touch the button on your Yubikey.
Once you have completed the DUO push, you will be able to navigate on
the remote site. Click your way to /nsls2/data/bmm/ as shown below.
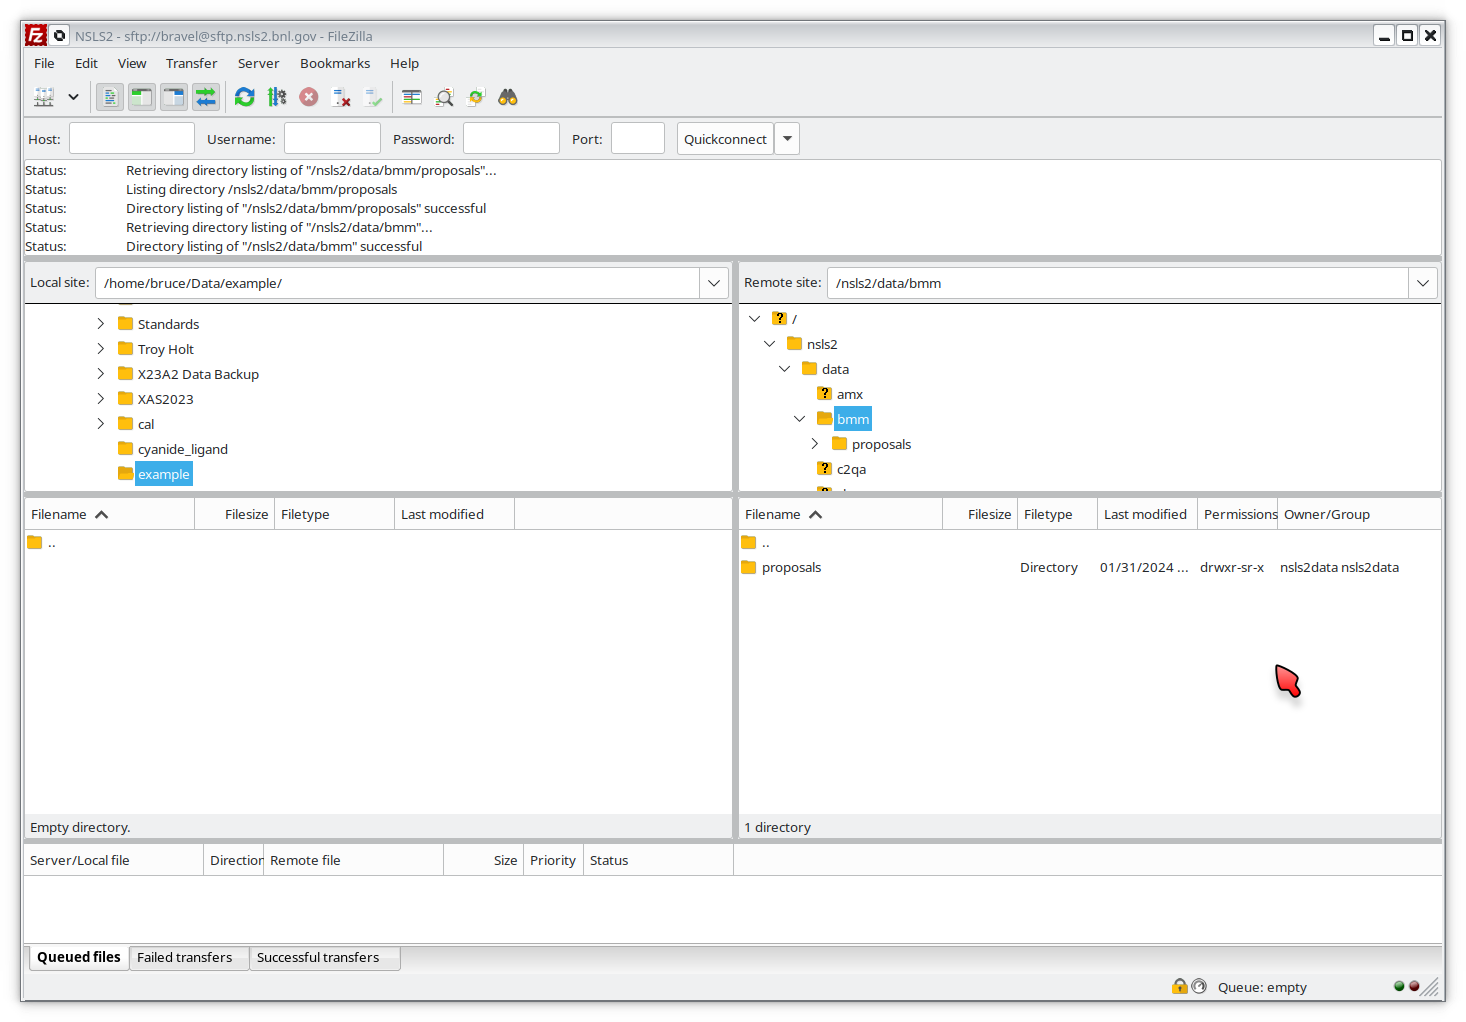
Fig. 4.5 Navigate down to the BMM proposals area on the SFTP server.#
Click into proposals then into the folder for the cycle in which
your experiment happened, then into the folder for your proposal
number:
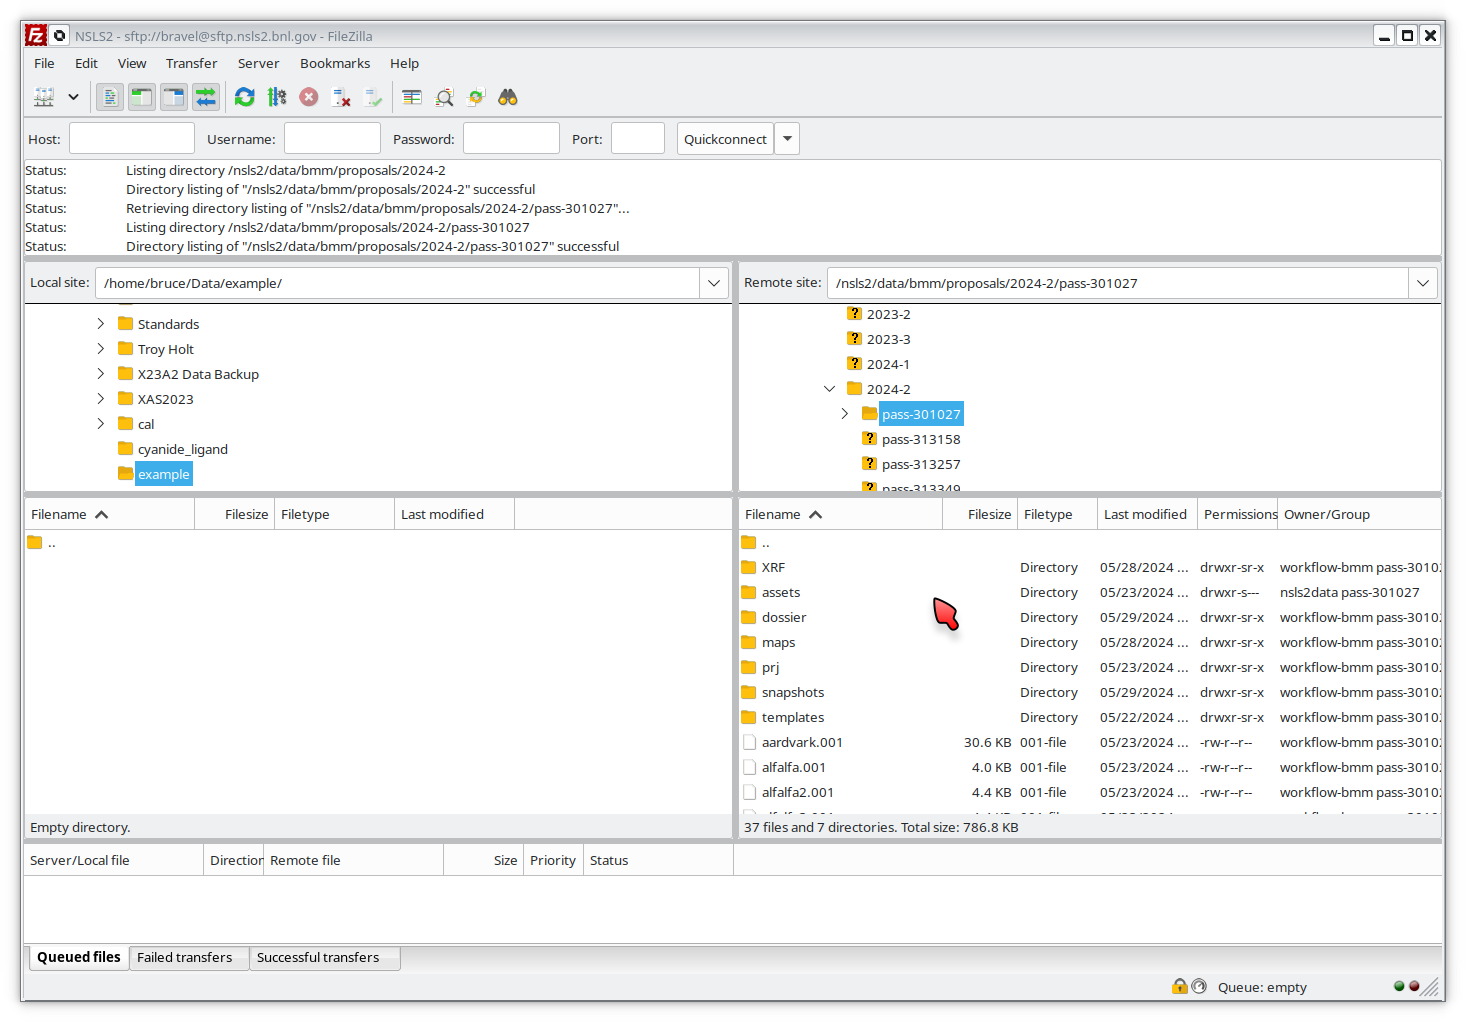
Fig. 4.6 Navigate into the folder for your proposal and the cycle in which it ran.#
Now select the data files you want to transfer. You may select multiple files or even entire folders.
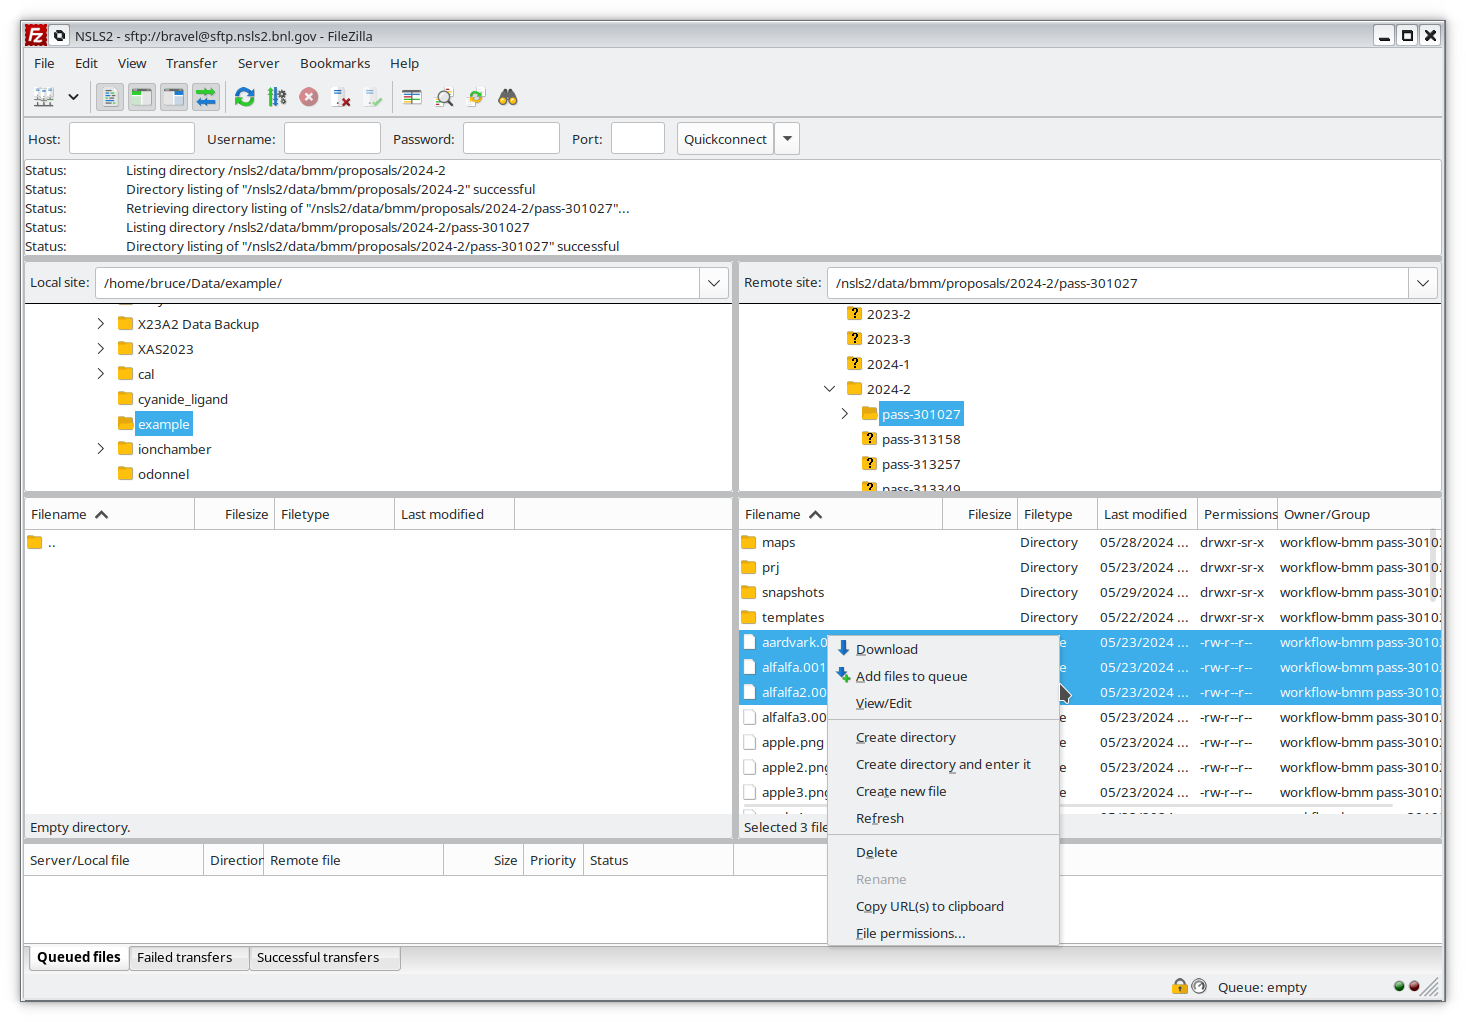
Fig. 4.7 Select some or all of your data and add it to the queue.#
Click on the transfer button at the top of the screen to initiate the transfer. At the beginning of the transfer, you will have to re-authenticate yourself.
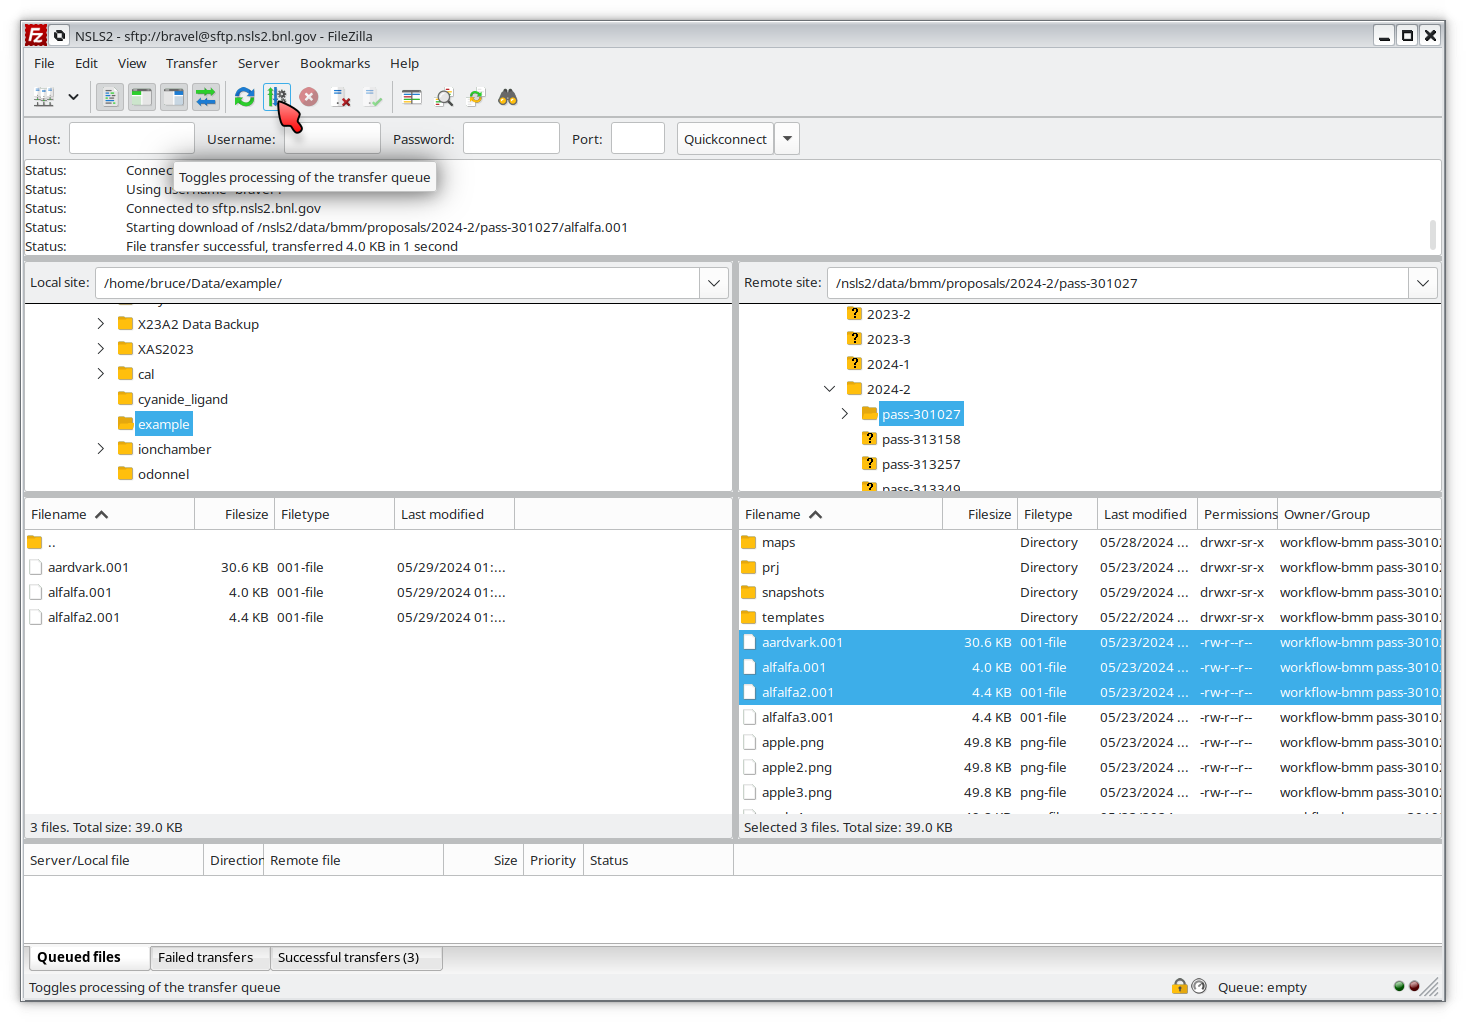
Fig. 4.8 Click the transfer button to download your data. You may need to re-authenticate at the start of transfer.#
Your data is now on your computer. Yay!
4.2. Accessing data with Globus#
Data volumes at BMM are such that sftp is usually easier and more efficient than using Globus. We recommend that you use sftp to access your data. However, Globus is an option.
To use Globus, you must transfer data to a Globus endpoint at your institution to which you have access.
Alternately, you can run Globus Connect Personal (GCP) on your own computer. Follow the download and installation instructions and start an instance of GCP on your computer.
Once you have identified either an institutional endpoint or you have GCP running, point your web browser at http://globus.nsls2.bnl.gov/.
In the remote panel on the left side of the page, navigate to your
proposal directory, which will be something like
/nsls2/data/bmm/proposals/2024-3/pass-123456, where you would
replace 2024-3 with the operations cycle of your visit to BMM and
replace 123456 with the proposal number of your experiment.
In the local panel on the right side of the page, navigate to the location to which you want to download your data.
Select the data (or data folder) you wish to download and hit the start button above the remote folder.
4.3. Accessing data from the beamline computers#
Under the new data security regime, the beamline computer does not
have normal access to your data. This is because all users run their
experiment as the beamline operator. If the beamline operator –
xf06bm – could see data, than any user could look at any other
user’s data.
Instead, data are stored on central storage with read permission granted to everyone named on the user proposal. In this way, data are secured from other users and access to the data requires authentication.
To look at your data while at the beamline, do the following
Open a terminal window. Normally a terminal window with a white background is open on screen and intended for this purpose. bsui is typically run from a window with a black background, so the white background is meant as a visual cue indicating that it is the place for data access.
In that terminal window type
su - <username>
replacing
<username>with your actual user name. Enter your password and respond to DUO push.cdto/nsls2/data3/bmm/proposals/2024-2/pass-123456, replacing2024-2with the cycle of your visit and123456with your proposal number.
athena can be launched from the command line. The best way to do this is to type
dathena > /dev/null 2&>1 &
at the command line. That incantation will suppress spurious screen messages and put athena into the background so you can continue using the command line. From there, simply use athena’s File menu to load data from your proposal folder.
4.4. Using the VDI virtual Desktop#
Todo
Details needed
Outline:
Point your browser at https://vdi.nsls2.bnl.gov/
Either download the client app or use the browser. These are the two choices offered on the landing page.
Open an N2SN linux desktop
In terminal or with file browser, can navigate to
/nsls2/data/bmm/proposals/<cycle>/pass-123456.
Issues:
Need to give advice on navigating linux desktop
Seems to be no Athena
4.5. Accessing data via Tiled#
First off, here is the Tiled documentation .
To start, you must first install Tiled on your computer:
python3 -m pip install "tiled[all]"
To upgrade from an earlier version of Tiled:
python3 -m pip install --upgrade "tiled[all]"
In a python program, jupyter notebook, or ipython session, do this:
from tiled.client import from_uri
client = from_uri('https://tiled.nsls2.bnl.gov/api/v1/metadata/bmm/raw')
You will be prompted for your BNL username and password. A DUO push will be sent to your phone (the DUO push may happen silently … if things appear to be hung, check your phone to see if a DUO push has arrived).
At this point you have access to data from BMM. To interact with the data, you will need scan UIDs. For example:
In [8]: client['5b3b526c-f3d4-4bac-86a5-394835fe06a7']['primary']['data']
Out[8]: <DatasetClient ['time', 'It', 'dcm_energy',
             'dcm_energy_setpoint', 'I0',
             '7-element SDD_channel01_xrf', 'Hf1',
             '7-element SDD_channel02_xrf', 'Hf2',
             '7-element SDD_channel03_xrf', 'Hf3',
             '7-element SDD_channel04_xrf', 'Hf4',
             '7-element SDD_channel05_xrf', 'Hf5',
             '7-element SDD_channel06_xrf', 'Hf6',
             '7-element SDD_channel07_xrf', 'Hf7',
             'dwti_dwell_time', 'dwti_dwell_time_setpoint', 'Ir']>
The measurement in this example was fluorescence XAS using the 7-element detector. So μ(E) data can be plotted like so:
import matplotlib.pyplot as plt
uid = '5b3b526c-f3d4-4bac-86a5-394835fe06a7'
dataset = client[uid]['primary']['data']
energy = dataset['dcm_energy']
i0 = dataset['I0']
ifluo = (dataset['Hf1'] + dataset['Hf2'] + dataset['Hf3'] +
         dataset['Hf4'] + dataset['Hf5'] + dataset['Hf6'] + dataset['Hf7'])
plt.plot(energy, ifluo/i0)
The ion chamber signals will always be called I0, It, and
Ir. The fluorescence signals will always be the one- or
two-letter symbol of the element being measured followed by the
detector channel number.
You can know the element being measured in any XAS record by checking the metadata:
client[uid].metadata['start']['XDI']['Element']['symbol']
You can find the UID of a scan by examining the header of an
XAS data file (see Section 9.7). Look for
the line that starts # Scan.uid:.
Searching
Need an explanation of doing datetime searches to get data from a specific experiment.
Need an example of searching for a specific GUP or SAF to get data from a specific experiment.
4.6. Accessing data via Jupyter#
Todo
Details needed
4.7. Why is data security important?#
For those who have been coming to NSLS-II over the last decade, this new emphasis on data security might be a bit surprising. In short, the new data security model is consistent with Department of Energy data policies.
Recently, there were a pair of incidents involving accidental leaks of sensitive synchrotron data to unauthorized parties. This sort of violation of DOE policy can have an impact on the authorization to operate NSLS-II as a user facility. Safe operations of the facility includes data security.
As a result, our Data Science and Systems Integration team at NSLS-II has been begun moving the beamlines to a data acquisition model that includes sound data security practices. BMM volunteered to be an early adopter of the new data security practices. We now provide an excellent user experience at BMM that also includes secure data management.
4.8. Map of the data server#
Each beamline has a storage location. In the case of BMM, the data
are at /nsls2/data/bmm/proposals. As show in the right of
Figure 4.9, the proposals folder has
folders for each cycle. In each cycle folder, there are folders for
the experiments in that cycle.
The permissions in the cycle folder,
e.g. /nsls2/data/bmm/proposals/2025-1, are such that no one can
write files, although anyone is able to see the list of experiment
folders.
The permissions in an experiment folder,
e.g. /nsls2/data/bmm/proposals/2025-1/pass-316886, are such that
anyone listed on the proposal can read and write. Beamline staff are
also able to read and write in all experiment folders. This extends
to making new folders, which will inherit the same permissions. Thus,
the user is able to organize their data as they wish. New files –
athena project files, spreadsheets, PowerPoint files, whatever –
can also be written to this folder.
Attention
The beamline user, xf06bm, cannot read or write in the
experiment folder. To interact with the contents of the experiment
folder, users must authenticate themselves. This can be done with
VDI (see Section 4.4) or by using the su
command in a terminal window.
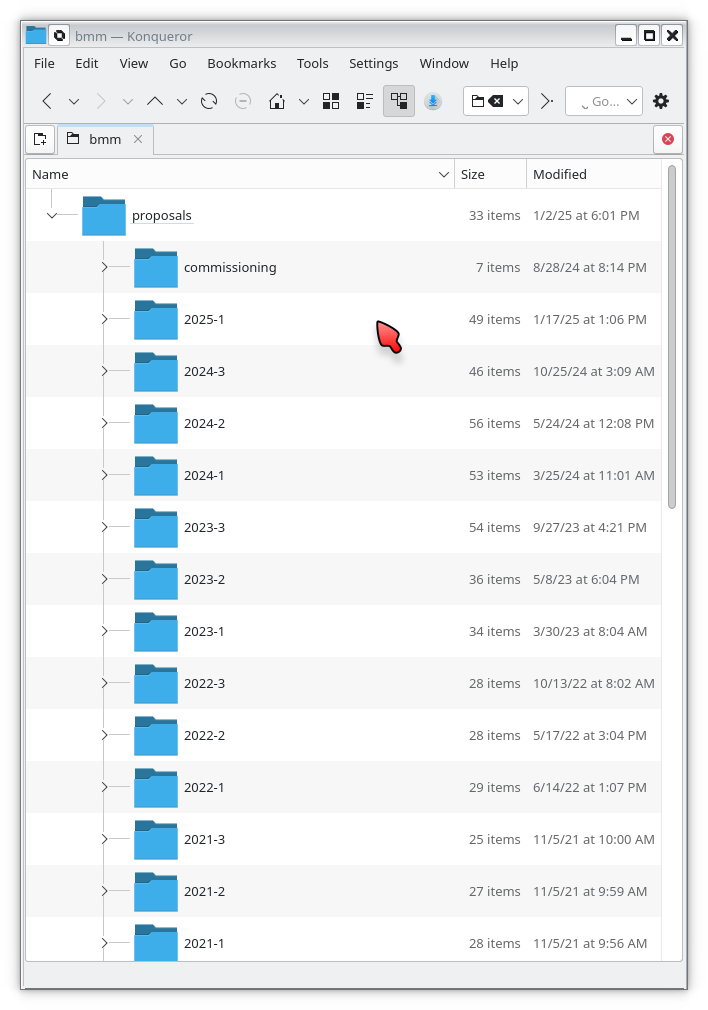
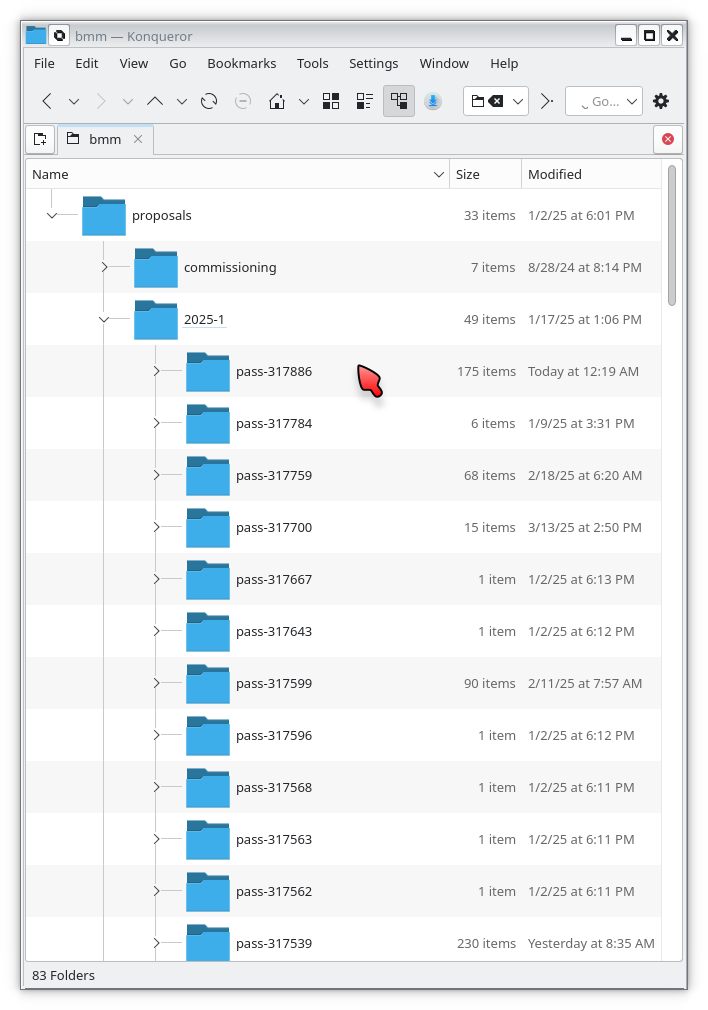

Fig. 4.9 (Left) The beamline proposals folder contains a folder for every cycle since 2014-3, when NSLS-II started. (Middle) Each cycle folder contains a folder for each experiment that cycle. (Right) The experiment folder is where your data are written.#
In each experiment folder is a folder called assets. The
permissions in the assets folder and all its subfolders are such that
users and beamline staff can read files, but cannot write, modify, or
delete files.
In the asstes folder, there is one folder for each instrument at the beamline. Each instrument is configured to write its data into its assets folder. Because this is raw, unprocessed, uninterpreted data, it is considered a sort of ground truth of the measurement. That is the reason for the restrictive permissions on the assets folder. Any interpretation of assets data by the user should be written elsewhere in the experiments folder.
For example, the HDF5 files containing the XRF spectra from the
Xspress3 at each point in an XAFS scan are written to the
xspress3-1 folder.

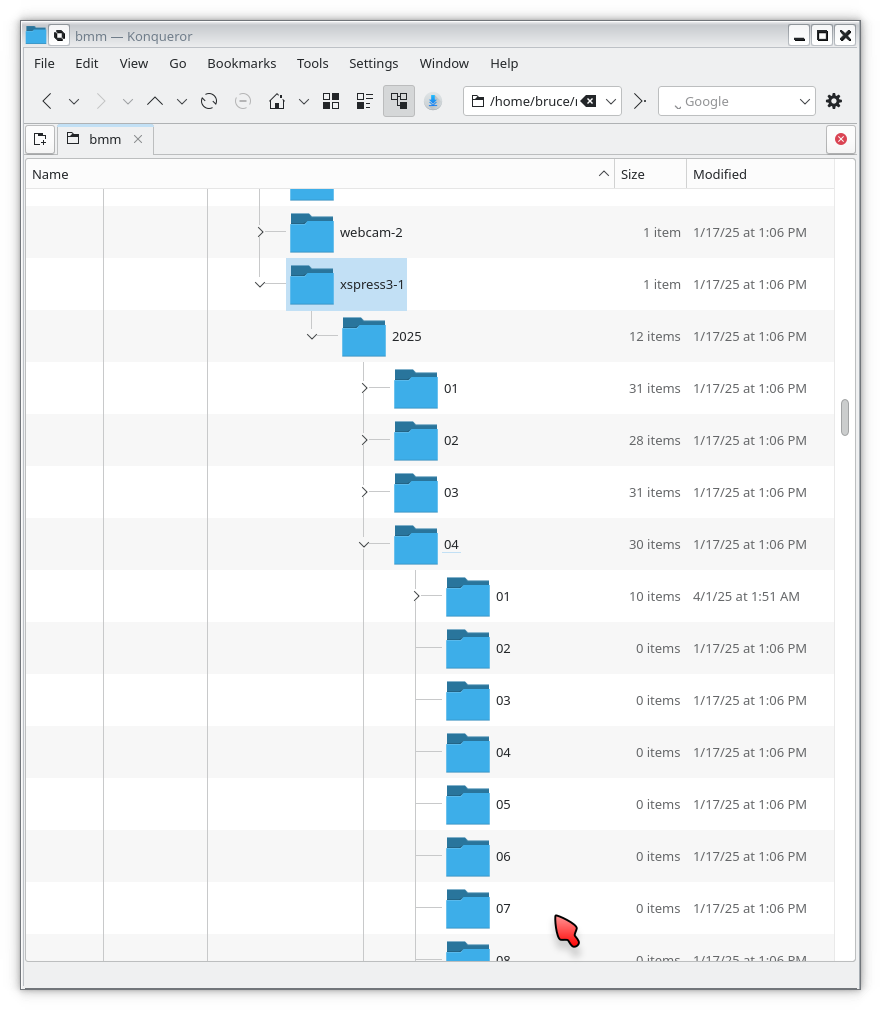
Fig. 4.10 (Left) Assets folder contains one folder for each instrument at the beamline. (Right) Instrument folders often have dated subfolders. The Ophyd objects interacting with these instruments are often configured to use the dated folders automatically.#
Note
The data folders for all beamlines work as described here.
